AREA.gifA detailed look at WAD files

DOOM stores its information about each of the levels in WAD files. DeePsea edits these files.

There are two types of WAD files.

IWAD File

The main file, DOOMx.WAD, contains all the information about the graphics, sound, level maps, etc. for the game. This file is an IWAD file. There is one IWAD file. Each game has its own file. The names HERETIC.WAD, HEXEN.WAD and STRIFE.WAD reflect the names for those games. (The shareware versions have a number added). The HEXEN addon, Deathkings of the Dark Citadel is internally an IWAD but for all practical purposes is just like a PWAD. For that reason, do not use this file as an IWAD, instead open it up as a PWAD in a HEXEN project.

PWAD File

DOOM supports additional files that patch the IWAD file, hence PWAD. It contains updates for the IWAD file.

PWAD files created by DeePsea contain an updated map of a game level. PWAD files can be called anything, but it's nice to call them somelvl.WAD where somelvl is any name you like.

DOOM must be told to load a PWAD file. The -FILE parameter does this. It is added after you type DOOM.

Example: DOOM -file myown.wad -warp level# (level# represents a number).

Selecting DeePsea Test Level from the File menu automatically creates the above information.

Dirname / lump

The names in the WAD file are in a directory. Each level is assigned a name, for example, E1M1 is the first level in DOOM or HERETIC and MAP01 is the first level in DOOM II or HEXEN.

Pictures, sound, and level entries are more examples of directory entry names.

Lumps is another name for PWAD directory names.

A single wadmap corresponds to a single mission or level within a given game. Wadmaps are stored within a given game’s main wadfile until needed at runtime. The required wadmap resources and geometry are explained in the sections that follow.

The parts in a MAP or LEVEL

The following directory entries always appear for any level.

Name
Description
LevelName
For DOOM and HERETIC use the EeMm (e is the episode and m is the mission number), DOOM ][, HEXEN and STRIFE use the MAPmm convention, where mm is a 2 digit map number.
THINGS
Contains the thing data.
LINEDEFS
Contains the linedef data
SIDEDEFS
Contains the sidedef data
VERTEXES
Contains the vertex data .
SEGS
Created by nodes builder and defines ssectors.
SSECTORS
Created by nodes builder, divides all the sectors into convex polygons.
NODES
Created by nodes builder. This is binary space partition (BSP) that partitions the map. Using this the game engine can determine what walls are in front of others (points to SSECTORS/SEGS).
SECTORS
Contains the sector data.
REJECT
Created by some reject program, such as RMB or randomly by DeePsea for playing around. The reject resource (a 2-dimensional array) determines whether enemies in a given sector can detect or attack players in another sector.
BLOCKMAP
Created by nodes builder. Contains x,y blocks for each 64x64 spot on the map to simplify collision detection between walls and moving objects.
BEHAVIOR
For HEXEN and ZDOOM only, created by ACC. This is the compiled Pcode of the script for the map.
GL_xxxxxx
Lumps starting with GL_ are added by GLBSP for GL enabled ports.

Narrative on how all the parts of a level fit together

The best way to learn the details that follow is to play a level, see what happens and then examine the level with DeePsea. Start with the first level and work your way up. There's a lot of information, but each step is pretty simple. Learn from other levels the tricks used to get those spectacular scenes.

Print the TUTORIAL and depending on your game, load file DOOM1TUT.WAD, DOOM2TUT.WAD or HEXENTUT.WAD to learn the basics of WAD files and how to make them using DeeP. The HEXEN version has a simple script (see HEXENTUT.ACS).

SCRIPTS.WAD contains an introduction to HEXEN scripts (see SCRIPTS.ACS).

DEEPEXAM.WAD is a simple level that is readily made using the predefined Objects and easy LineDrawing in DeeP.

If you want to make a quick level just to see what this is all about, press F1 and select the topic Tutorial or you can selected Tutorial Interactive Demo from the top Help Menu bar and get an interactive introduction!

It helps to use the Grid when designing a level. The Grid makes it easy to align everything and maintains the sizes that work best for wall and ceiling textures (explained later). A grid size of 8 is recommended for most work. Use a larger grid when making large starting areas.

A level is created from smaller components, much like a house is built from 2x4's, nails and siding.

Here are the names of the parts you will be using.

The five components are Vertices, LineDefs, SideDefs (a part of LineDefs), Sectors and Things.

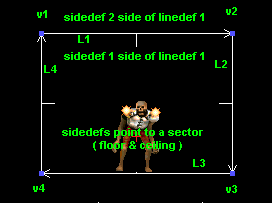
This drawing illustrates each of the parts:

Narrative1.gif

L1 to L4 are the LineDefs (the lines between them)

The first SideDef is on the side with the line sticking out. The second SideDef (if any) is on the other side. SideDefs are explained more later.

The area contained in the LineDefs is the Sector (all 4 lines belong to the same Sector)

Things are any creature or decoration, a Revenant is shown.

Vertices

Vertices are x,y coordinates on a map. DOOM maps are 2 dimensional. The height comes from Sectors, as you will soon see.

Vertices are used as the starting and ending points of LineDefs (next). These are the dots on the map in Vertex mode. Vertexes are usually NOT created by themselves (as in DEU), but rather are created automatically when you draw lines.

Doom Units

A Doom Unit is the name we give the coordinates numbers and the distance between two vertices. Just a made up name, but everyone asks what do those numbers mean?

LineDefs

LineDefs glue two vertexes together.

LineDefs are the lines in the map. These lines define the borders of a Sector or the location of a trigger that you walk across.

Bear with me a bit on Sectors. For now think of a Sector as the room or area where you are fighting for your life. A more precise definition about Sectors is later, so keep on going and come back and review this area again. I think it will be clearer the 2nd time (if you didn't get stuffed by the monsters).

Each LineDef has a starting vertex and ending vertex. This is similar to putting two dots on a piece of paper and connecting them to draw a line.

These lines end up being walls you see in the game. The walls have at least one side and to be seen, require a texture graphic.

Transparent LineDefs do not need any texture, since they are invisible. A common use is for a trigger activated when you walk across the LineDef. When you walk across the LineDef, it behaves like a tripwire. A transparent LineDef has a texture of -, which is none.

A trigger causes the Sector assigned to it to move up or down according to the type of LineDef. These cause the special effects as you blunder into things. (See Sector and LineDef tags below.)

Another common use of transparent LineDefs is to highlight an area or simulate lighting. You can draw letters in the sand or anything else you dream of. There are no walls, so all you can see is the floor and ceiling. If the floor and ceiling are different from the surroundings, they stand out (these are the Sectors that you see stand out, coming up soon).

It may help to stop here and edit a level, mess around with the different modes and see all the possibilities. The first level is suggested, since it doesn't have as many things going on and is easy to test since it's the first level.

If the wall can be viewed from both sides we need to describe the second side also (for example, a room within another room that you can walk around and enter through a door).

These sides are called SideDefs. The first side is called SideDef1 and the second SideDef2 (isn't this amazing).

The SideDef1 side of the LineDef is the side with the line sticking out of it in Vertex and LineDef edit modes.

All LineDefs go the same Direction (Most of the time)

The line sticking out from the side should be the same for all 1-sided LineDefs. Normally the arrows point in the clockwise direction for rooms and the opposite for an object in a room (see stair help).

LineDefs with two sides may go in either direction and be mixed in direction. If you have textures that like to follow you, try flipping the LineDef (do not flip the SideDefs yet!).

SideDefs

SideDefs glue LineDefs to Sectors. They represent each side of a LineDef.

A LineDef must have at least one SideDef. The SideDefs supply 2 more parts to finish the 3D definition:

  1. The wall textures (the way the wall looks)

  2. A Sector reference number. The Sector referenced gives us floor/ceiling textures and heights

When ALL the SideDefs (of LineDefs) form an enclosed area and share the SAME Sector reference number, we see a Sector. If other areas use the same Sector number reference (which is perfectly fine), they all light up in Sector Edit mode too.

SideDefs also glue to all the textures.

There are three possible texture locations for a SideDef: upper, normal and lower, representing what you see above, straight ahead and below your field of view.

The upper and lower textures are used when the floor and ceiling of adjacent sectors vary in height.

Upper Texture : Texture you can see above the ceiling of a Sector.

Normal Texture: Texture you see between the ceiling and floor of a Sector.

Lower Texture : Texture you can see below the floor of a Sector.

If everything was the same height, you would only need normal. (A boring level, yes? But you'll have to make a few of these first to get the hang of it all<g>)

Sectors

  1. Sectors glue Ceiling and Floor Textures together and define a Bottom (floor) and Top (ceiling).

  2. A Sector appears visually on the map when 3 or more LineDefs connect together to form an enclosed area.

  3. A Sector appears similar to a room or an area within a room but is by itself not the area.

  4. Sectors determine the ceiling and floor height and the ceiling and floor textures (the last part to get the 3D look of a level).

  5. A Sector adds the depth to the LineDef/SideDef connections. A Sector can be shared by many LineDefs that form independent areas, lending the same floor/ceiling heights and textures to those areas.

So don't think of a Sector as being the actual room (sorry about their choice of words) since it can describe many rooms and areas.

When you see more than one area light up in Sector edit mode, it signifies that the same sector is used to describe the highlighted LineDefs.

Special Sector information (damage/secret?) is also available.

Sectors are the only structures that move UP/DOWN in DOOM. Lifts, Staircases, Doors, are all specially defined Sectors. If you recall, the SideDefs connect all the LineDefs together to the same sector. So the area described by the LineDefs/SideDefs is the area that will move.

The LineDef+SideDefs look at the Sector types you used and acquire the property you assigned. So if it's Damage, all the LineDefs with that Sector assigned have health damage. If it says to move up, they all move up, even areas that are not where you are!! (If they have the same Sector.)

Sectors give the room the final touch. By varying the light intensity (or flicker) you can dramatically change the ambience of an otherwise bland room!

In HERETIC there are even more things you can do. The floor can scroll, you can have a nice breeze blowing (throws off the aim of shots) and to top it off, you can make it slippery too!

A short note:

There is one thing not obvious right now, (if this is your first trip in editing), but when you make floors and ceilings that move, you have to imagine the movement and supply textures for those areas that will become visible when the Sector moves up or down. If a floor moves up, you need a Lower Texture to pop up as it rises and if the ceiling Lowers, an Upper Texture has to slide down with it.

DeePsea automatically checks for this if the same Sector does not move both up AND down. Stairs are also ignored. HEXEN can have scripts which can do anything, so of course that makes it impossible for DeePsea to tell if textures are required for HEXEN if the action is script driven.

Please See Sector not Closed in Check for more information.

Things

Things are the objects that lend the final touch to a level.

Weapons, enemies, ammo, keys and decorations are visible Things. The places where players start the game and Teleport landings are also called Things.

If you place too many Things in a level, you may not be able to save games. A very large level with too many monster Things will crash DOOM. 700+ is a caution point.

You can display a picture of the ALL the things on the Map by pressing T again after you are in Thing edit mode (you get there by pressing T or selecting from a menu).

The display can be interrupted at any time by pressing any key. After the first display all the images are cached for improved performance.

HOM errors

Hall of Mirrors errors are what you get when something is messed up in your level. It looks like you're replicated a zillion times and the world won't stop turning.

We didn't invent this cute name. Matt Fell, the author of the unofficial DOOM specs mentions it. (Review his document for some additional information.)

Here are some common causes for HOM and others: (Some of the terms are discussed in other areas, so please review the rest of help.)

  1. You forgot a texture (easy to fix)

  2. Transparent Wall, 2-sided wall using a texture with more than 1 patch. Also called 'Medusa Effect'. Looks like snakes and turns you to stone (can also produce 'Tutti Frutti').

  3. 'Tutti Frutti', an attempt to display part of a Texture not covered by a texture Patch. Weird sparkles (typically pinks and greens, thus 'Tutti Frutti'). Typically caused by new textures.

The largebar grate textures cause this if displayed on too short a wall. Textures can also project in a false dimension, which can be fixed by unpegging them.

  1. A LineDef is shared by 2 sectors, but the 2-sided flag is not set (F10 menu will fix).

  2. A LineDef/Sector is sticking its nose across another LineDef/Sector (move it back).

  3. Too many 2-sided LineDefs are visible from any point (limit increased in 1.666 and later to 128) or too many 1-sided LineDefs (256).

  4. The Sector heights are messed up.

  5. A node building error. Rearrange the area, change the node depth, force a node line or use a different nodebuilder (see Node Depth).

  6. You have textures where they are not required.

  7. If you see a flash, you may have too many different upper textures visible in the line of sight. For example, creating stairs with over 16 steps with different ceiling heights may produce this symptom.

Areas with large numbers of directly visible walls are the most prone to this error. This also gives visi-plane overflows!

Reduce the numbers of LineDefs visible by combining two or more LineDefs into 1 (delete the vertices splitting them) or block the area from sight.

  1. DOOM has an error (especially DOOM, see stairs).

Sector and LineDef tags

A Tag number is a number that is used to connect LineDefs and Sectors. The connection is required so that the LineDef knows what Sector you're talking about.

Question: If you have a switch that you want to use to operate a door, how will Doom know what door to operate?

Answer: You give the LineDef with the switch a number and give the door Sector the SAME number.

These numbers are called Tags. Tag numbers have nothing to do with anything else.

The tag in a LineDef is called a Sector Tag. It refers to a tag number in a Sector. The tag number in the LineDef and the Sector are the same.

The tag in Sector is called a LineDef tag. It refers to the tag number in a LineDef. The tag number in the Sector and the LineDef are the same.

Each Tag number is unique, that is, it is not used by any existing LineDef/Sector.

  1. You can have one LineDef tag point to multiple Sectors. Then all the Sectors move as specified by the LineDef type.

  2. Two or more LineDefs can point to the same Sector. A typical use has one LineDef lower the floor and another LineDef to raise the floor. Typically you see these as switches.

For now we are assuming you are starting from scratch. So the first available number (on a new level) is 1, the next 2,3, and so on. You can skip around if you like (although that makes it harder to keep track).

The menus automatically show you a free number in one of two ways:

  1. With the (##). In other words, the number '##' within the () is not used anywhere.

  2. As f##,u## The f## is not used anywhere and the ##' is the last number you used. This also applies for HEXEN PolyIds and Thing Tids.

HEXEN mode automatically assigns Tags, PolyIds and Tids as appropriate. Door Tags for types 12 and 13 are not assigned, since they are optional if the linedef is directly connected to the door sector.

Once you give the LineDef this tag number (Sector Tag), go to the Sector with the Door (or anything that works with tags) and give it the same Tag number (LineDef Tag). This connects the LineDef to the Sector.

Use the Search for LineDef/Sector tag to locate a tag number if you forgot where you used it.

In LineDef mode, a LineDef with a tag shows the tag number and the Sector number it is connected to in- between the (). The Sector also lights up in Red.

In Sector mode, a Sector with a tag shows the tag number and the LineDef number it is connected to in-between the (). The LineDef also lights up in Red.

HEXEN LineDefs

In HEXEN, the LineDefs can be programmed to vary the height, speed, delay, etc. This is noted in the description as +tag-speed-height..etc. DeePsea has some default values, but you have to supply the tag if required and adjust the parameters for your level. Tags, PolyIds and Tids are automatically assigned the next free number, with Doors excepted as noted above. Use the Edit LineDef Special option to override any of the 5 parameters.

If a LineDef already has upper bit values to set repeatable, etc, DeePsea does not override the settings. In addition, if you select a LineDef type but do not change it, that is you pressed Enter (repeating the current LineDef type definition) none of the LineDef settings are changed. This is a safety to prevent DeePsea from overriding any special flags you may have set.

LineDefs with Scripts, display as Light BLUE (you can change the color).

Please refer to HEXSPECS.DOC for more detailed information.

MAP Object Colors

When an object is selected (by Left clicking) it will change color and the object select count (upper right top line) is increased by one. Refer to this to keep track of your work.

Things with the same color are all the same type.

LineDefs of different colors signify tags or possible texture problems. Look at the information displayed on the bottom texture boxes to tell.

Press F1 help in the Mouse/Line Color option menu for detailed color information.

All the same Sectors will turn Yellow, so you can readily spot where they are used. Red indicates a Tagged Sector/LineDef relation or an error in the SideDef where it appears.

See Color Options (press F1 in that menu ) for a definition of all the colors on the map.

Design and Shaping of Areas

Note: This is an overview of design and shaping. Review each command for specific instructions.

You should have a PLAN before you start drawing. This will minimize the amount of work you have to do. Even for first time users, decide what area you are going to modify and what your goal is.

We suggest modest goals and don't try to immediately make doors and teleports. Instead, make a room larger and extend the walls some. Learn about the difference between walls with only 1 side and those with 2 sides. For example, on 1-sided walls you can use any of the textures, but on 2-sided walls begin by using only the textures that say TRANSPARENT. As you learn more, you’ll see that many multiple patch textures are O.K. to use.

Note: There are always exceptions. They only work using special construction tricks. For now, keep it simple. If you discover a level that violates the rules, first make sure that it really works, then try it yourself. If it fails, the other guy was lucky or you forgot to do it EXACTLY the same.

You can change your mind, but it's like building a house. If after you build a house you decide the bathroom doesn't belong there, you have to tear it all down along with some adjoining structures, so you can see the mess you might get into!

Any intricate design is made in LineDrawing mode. LineDrawing mode can be entered at any time by pressing Ctrl+D or quick Double right mouse click and select Drawing mode. In Vertex mode a quick double left Mouse click also works.

This following guidelines Drawing Tool are related to the way DeePsea determines whether to create 1-sided or 2-sided linedefs and is NOT a DOOM rule as such. Play around drawing different ways and it should become clear how this works. If you don’t understand the terminology of 1-sided and 2-sided, please review the basic terms and spend some time looking at the detail parts of a level.

Intelligent Inference Drawing (IID) examines the context of the area you draw in. When it does this, most of the details, such as Sectors and SideDefs are made for you as you progress.

In the next stage you start tuning your level by changing the heights of floors and ceilings. At this step, you have to add textures for the walls that are exposed from differences in heights. DeePsea can automatically supply missing textures, but this is only for beginners. It has no idea what the scene should look like, so use the check instead and make it as you intended.

You can also create predefined (or prefabricated) shapes such as Rectangles, Polygons, Stairs and Doors using the F9 (Object) menu. This is called TOOL mode. There are also Pools, Pedestals/Boxes, Windows and Teleport pads available.

TOOL mode is productive for both the beginner and the expert. It gets rid of the busy work and gets you to the creative part of your design quicker! Use the TOOLs in LineDef mode for automatic LineDef merging.

In TOOL mode, the objects can be drawn to size and then dragged anywhere by using a combination of mouse buttons and keys. The interactive feature of all the Tools makes it easy to create the object where and how you want it.

Press F1 help when using the Tool for more details.

Objects made using the Object menu are meant to be SEEN and have most of the required textures when created. You may have to supply additional textures depending on the final heights of everything. The check menu can do this automatically.

Rectangles and polygons made from the Mode menu (or from quick double Right clicking mouse menu), are meant to supply floor and ceiling textures for Room effects. They are created as 2-sided with no textures when made inside an existing Sector.

These can be made into objects if you change the floor and ceiling heights and add the required textures.

Design and shape areas after they are made by dragging the vertex points (using the right mouse button) to any location. This is the most flexible.

Areas are shaped in LineDef, Vertex and Sector mode. In LineDef mode lines are dragged, in Vertex mode, vertices are dragged and in Sector mode areas are dragged and shaped.